
*Images will be added shortly.
Notes:
============
I'm sure these steps are very similar on Windows, using Command Prompt instead of Terminal, but I used OS X so I can't make any guarantees if the steps are not exactly the same.
This might not be the best or easiest way, but everything I found was very similar and this method worked for me.
This works for all Android versions which includes Android 4.2.1, 4.2.2, 4.3.x, and 4.4 KitKat.
This guide includes making a backup and restoring everything.
Uses ClockworkMod.
Recommended:
============
Remove any type of security to access your phone whether it be a PIN or Pattern. (might cause issues when trying to backup).
Turn on Airplane mode to prevent any updates or incoming new messages to not be backed up.
Save the downloads and extract them to your Desktop.
Downloads:
============
Android File Transfer - Will be used on OS X to backup your data.
Nexus4Root - Contains the main files to unlock bootloader.
CWM SuperSU - Roots the device and installs SuperSU on your phone. If using 4.3 or 4.4 use this file. If using an older version of Android, use the one included in the Nexus4Root.zip.
Clockwork Recovery Touch - Nexus4Root includes a version of this but if you want the latest you can download and replace the file in the Nexus4Root extract.
Guide:
============
Go to Settings > About Phone

Tap the Build Number until you see the "You are
now a developer" message.

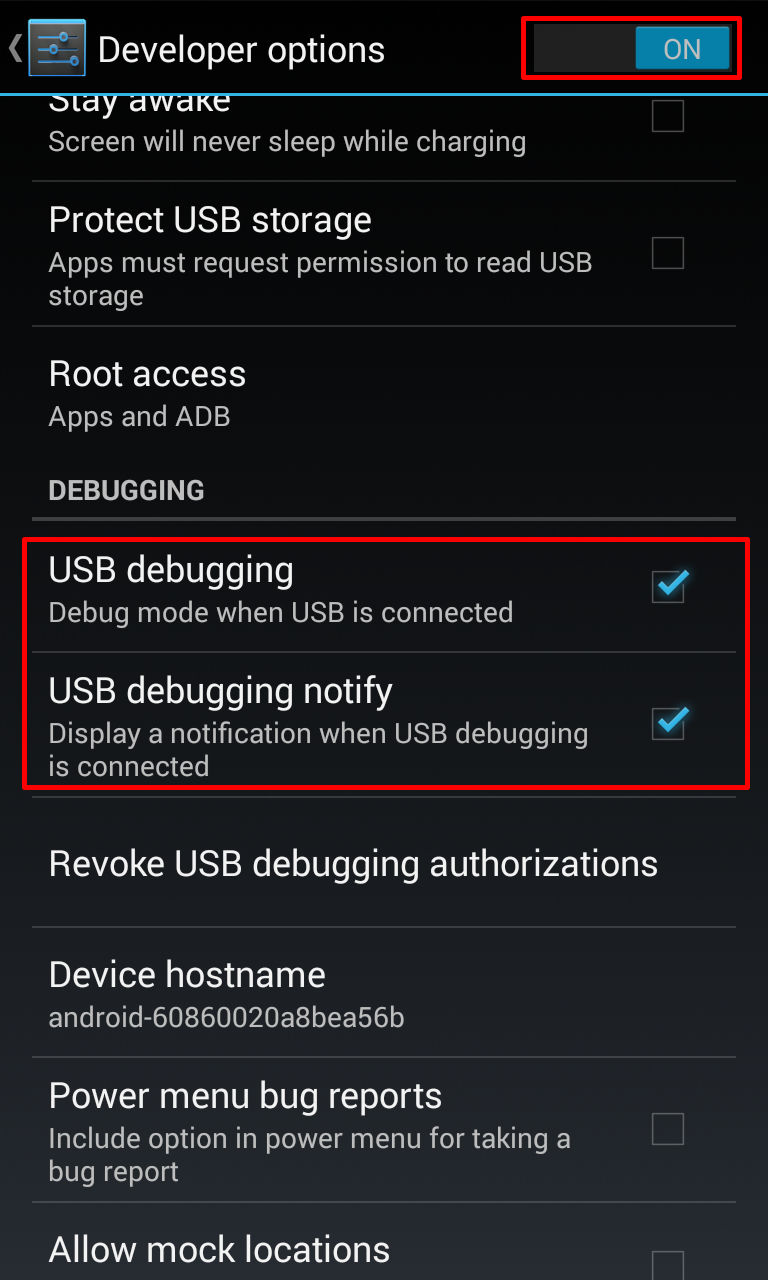
Go back to Settings and select Developer Options.
Turn on Developer Options and make sure USB debugging is checked.
If you haven’t downloaded and installed Android File Manager do so
now. Also download and extract Nexus4Root to your desktop.
Connect a micro-USB cable to your phone and computer. If you've
already installed Android File Transfer it will most likely automatically open.
Backup your phone
by copying all the files from Android File Transfer to a folder
on your OS X desktop.
*If it looks like it is stuck your
phone may have some security setting whether it is a PIN, Pattern, etc. Unlock your phone and the transfer should
start.
Open Terminal on OS X. Using Spotlight would be the easiest way to open it.
In Terminal type cd
Desktop/Nexus4Root
 In Terminal type chmod 755 *

In Terminal type ./adb-mac
devices
 *You should see device meaning it is being detected. If it is not listed or is offline, unplug the phone from the computer and plug it back in again.
 In Terminal type ./adb-mac
backup –apk –all –f backup.ab
In Terminal type ./adb-mac
backup –apk –all –f backup.ab


On your phone it should display an
option to backup your data. Select Back up my data. If you wish to encrypt
it with a password you can, I did not.
*The backup
may take anywhere from 1-20 minutes depending on the amount of data you have on
your phone. If it looks like it is
stuck, it most likely is not, just give it some time.
Once completed Power off you device and unplug
it from the computer.
Press
and hold the Power button and
the Volume down button until you see
the bootloader menu.
Your phone should say that it is locked on the bottom of the bootloader
screen which is normal.
On the bootloader screen plug in your micro-USB cable from the computer to your phone.
Go back to Terminal on OS X and type ./fastboot-mac
oem unlock
*This will wipe your phone. Hopefully you made a backup in the earlier
steps.
On your device press the Volume Up button to select Yes.
Then press the Power button
to confirm. You should now see on the
bootloader screen where it used to say locked
it now says unlocked. You have successfully unlocked the
bootloader. Press the Power button again to reboot your
phone.
*While booting your should notice an
unlocked lock which also means the bootloader has been unlocked.
Once your phone has booted you will
see the set up menu as if it’s a new phone.
Everything has been wiped. Go through the set up process until you get
to the homescreen. You can just skip
everything as we’ll restore your content and settings later.
Reconnect your phone
if it is not connected and copy the
file CWM-SuperSU.zip by dragging and
dropping it onto your phone using Android
File Transfer. Copying and pasting
does not work.
Power off your
phone and boot it while holding the Power and Volume Down button until you see the bootloader screen.
Go back to Terminal and type ./fastboot-mac
flash recovery recovery*.img
If everything works you
should see some OKAY messages in Terminal.
On your phone use the Volume toggle to switch to Recovery mode, then press the Power button.
Once in ClockworkMod(CWM) Recovery
select “install zip from sdcard”.
Then “choose zip from sdcard”.
Select “0/”.
Browse/scroll and select CWM-SuperSU.zip file, the one
you copied over, and select Yes, which
will root your phone and install the SuperSU app.
Once completed navigate back to the
main screen and select reboot system now.
If you see a message about the
"ROM may flash stock recovery on boot. Fix?” select Yes.
Once your phone has rebooted you
should now see a SuperSU app in your
app drawer.
Congratulations, your phone
is now rooted.
Time to restore your previous settings.
If you made a backup by
copying all your files from Android File Transfer from your phone to your computer you can reverse
the process and copy all of the files from your computer to your phone.
You’ll most likely have to re-enable Developer options by going to
Settings > About phone then tapping
on the Build number until you see
the message saying “You are a developer”.
Go to Developer options, make sure it is on, and make sure to enable
USB debugging.
Next, in Terminal type ./adb-mac
restore backup.ab
On your phone selected Restore my data.
*Again, depending on how big the
backup was it may take anywhere from 1-20 minutes.
Once done your phone should be back to what it was before starting this process,
but with the addition of root
access.
*Some apps may require you to
re-enter your password.
Wasn’t so hard now was it, just a tad bit long? Hope this helped. Now go and install a custom ROM or kernel.
Enjoy!!
Not sure which ROM you want to try. Check out my other article.
No comments:
Post a Comment